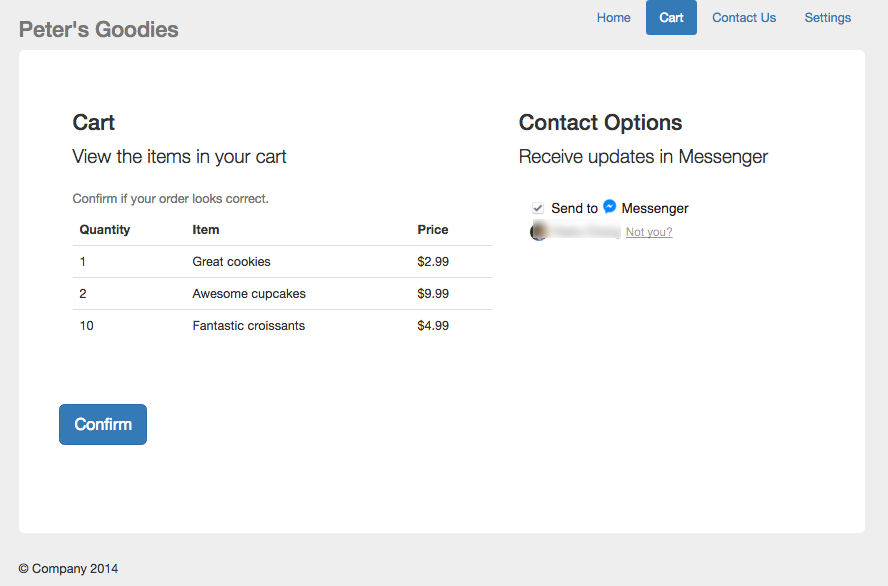
You can make it possible for individuals to opt in to receive messages from you on Messenger by including a checkbox plugin in any forms that they fill out on your website. This comes in handy when offering follow-up at a later time, such as confirmations and changes to the information that was previously provided. This plugin is only compatible with websites that use HTTPS.
CODE GET, EDIT , AND DELETE CODE #
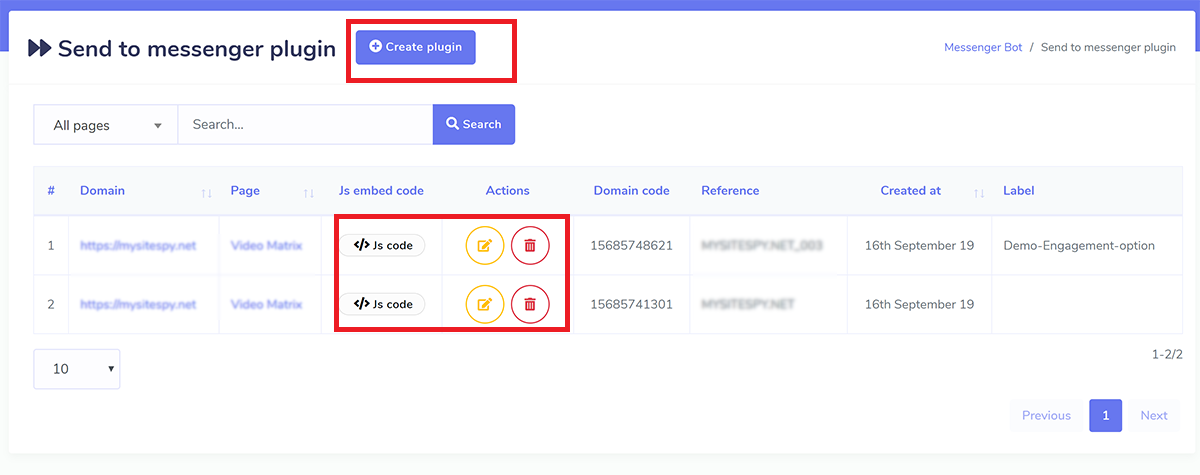
This list presents all of the plugins that you have developed up to this point, and it allows you to retrieve the embed code for a specific plugin even if you have lost it, modified it, or removed it.
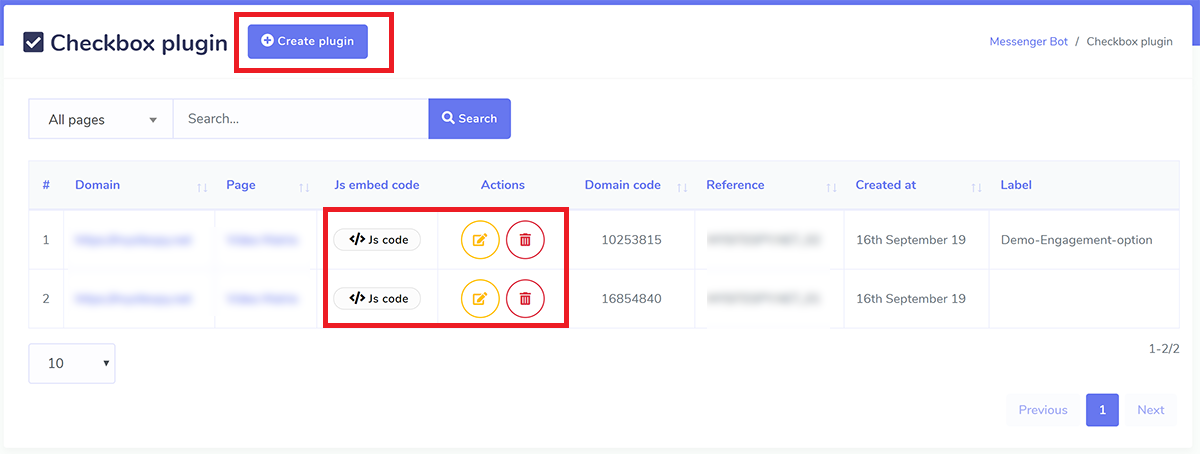
Simply select the “Create Plugin” option in order to produce a new plugin.
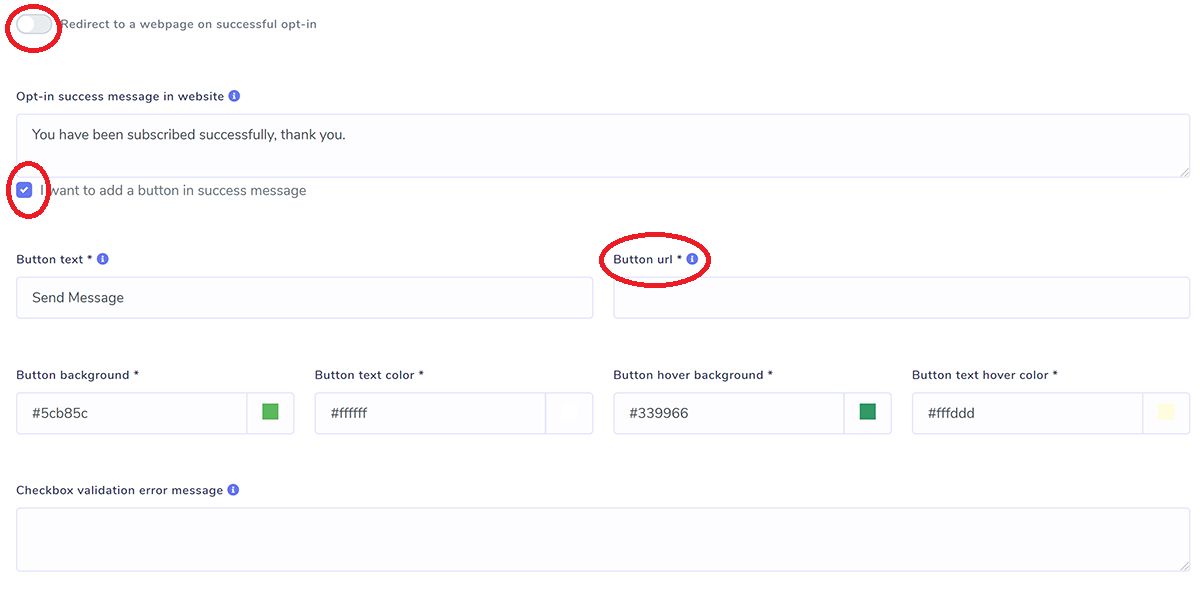
INSTALL A BUTTON IN THE SUCCESS MESSAGE #
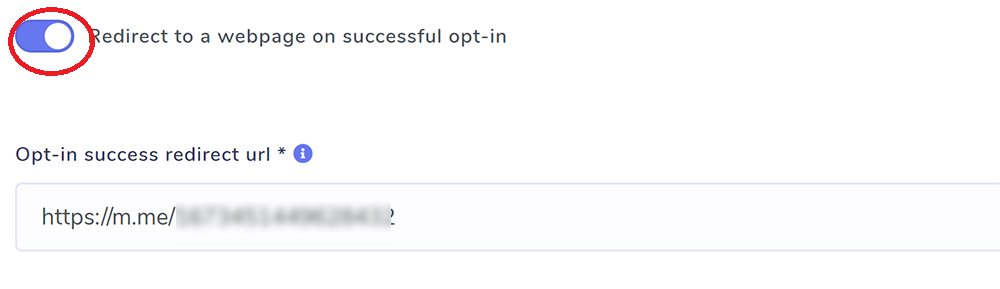
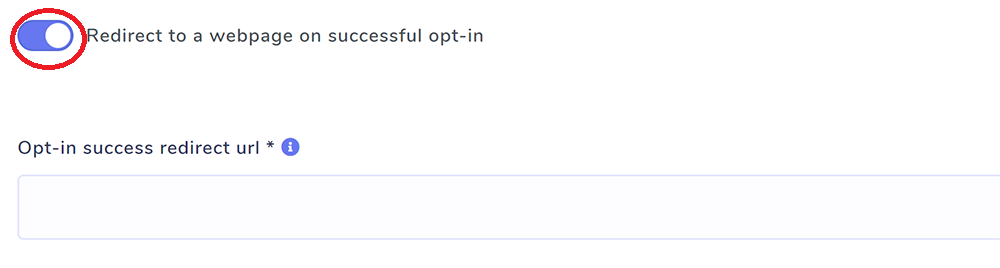
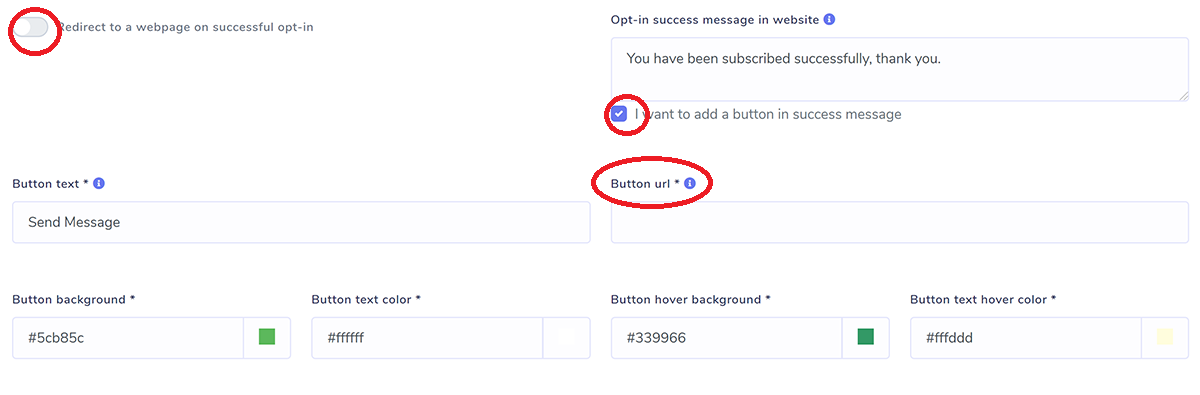
When you successfully opt in, this message will be displayed. If you so choose, you can add a button within the success message, and you can also include a URL for further action. You also have the option of creating an error message to appear in the event that the checkbox is left unchecked.
OPTIN Confirmation Message Received in Inbox, Reference Given, and Label Assigned
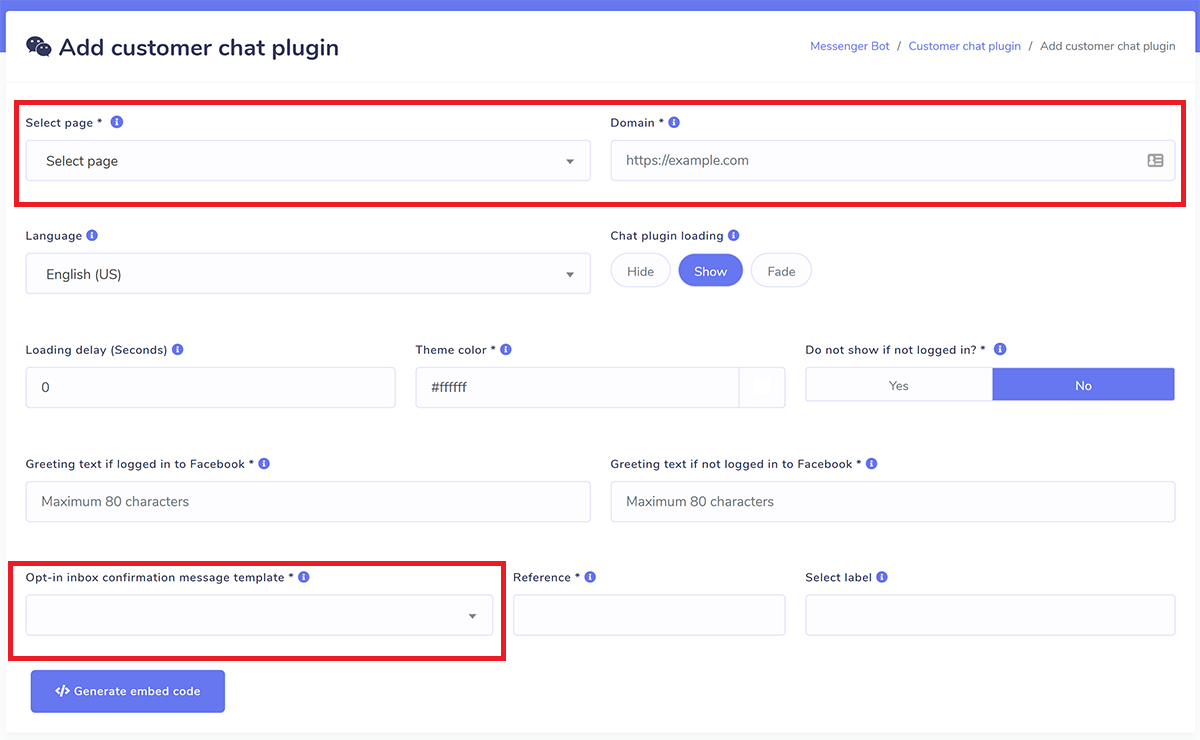
Pick the format you want to use. When the system sends the welcome message to the visitor’s messenger inbox, this template will be utilised to format the message. Users of the plugin will be automatically categorised according to the criteria you provide in the system. Keeping track of the plugin requires using the reference.
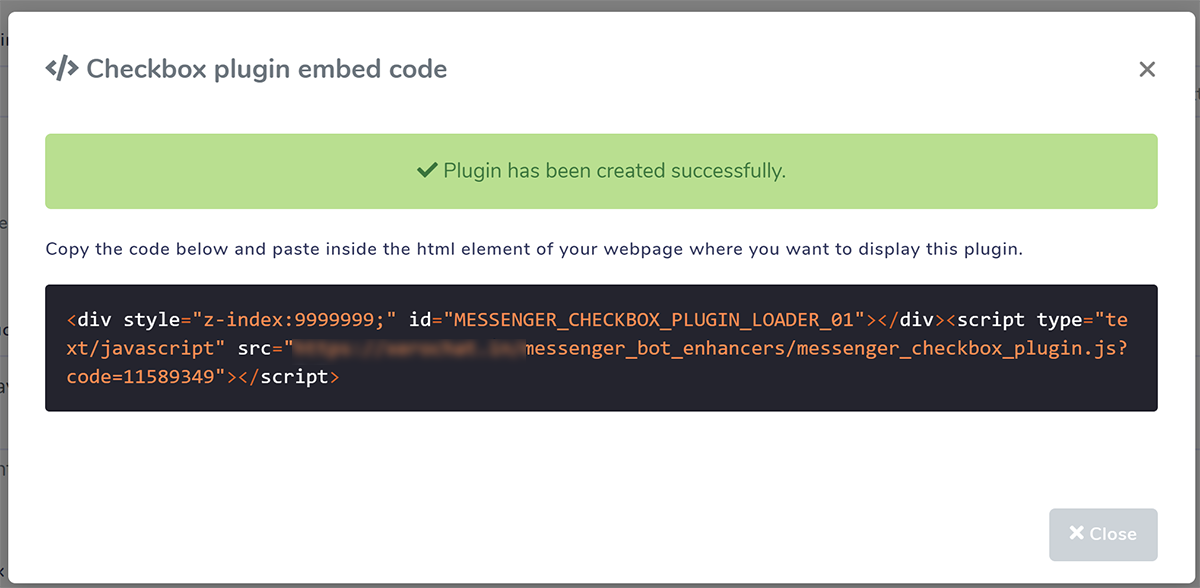
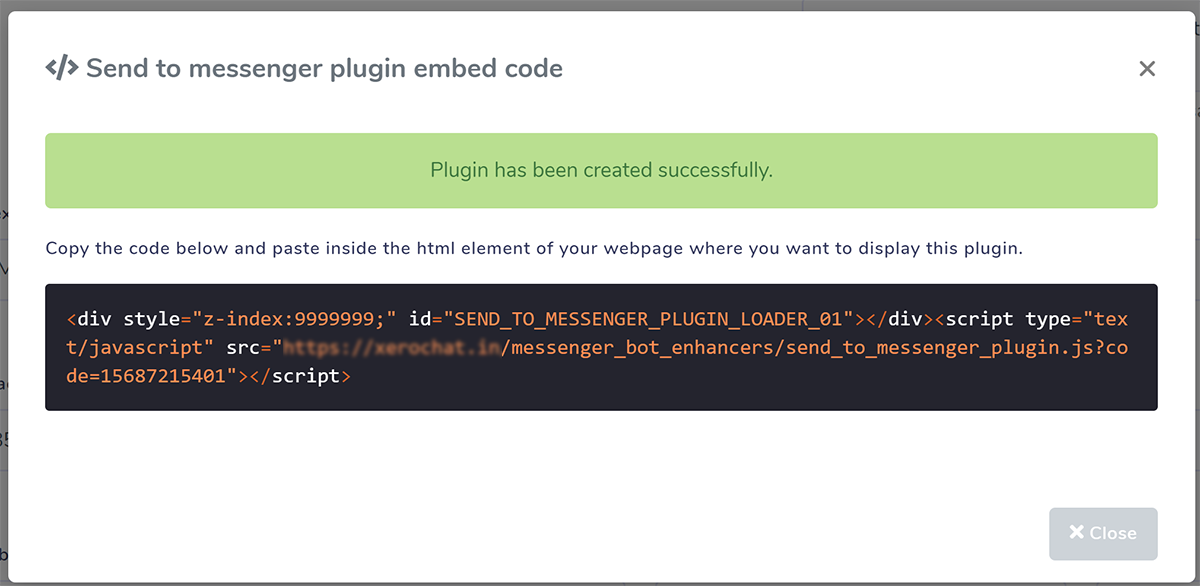
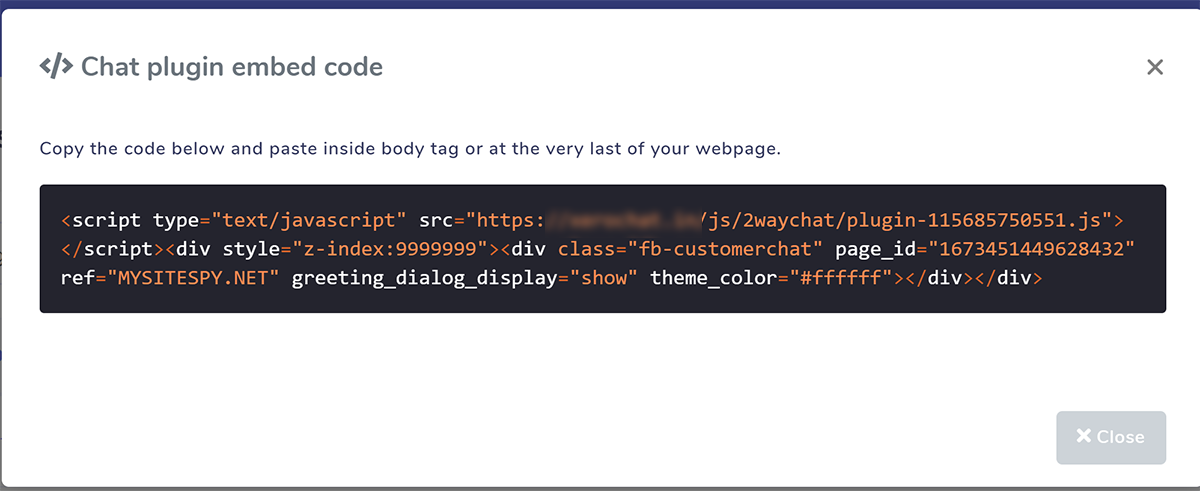
Make a copy of the code that is displayed, and then paste it into your website.
Insert this code into the html block on your website at the location where you want this plugin to be shown.
Plugin for sending to messenger. #
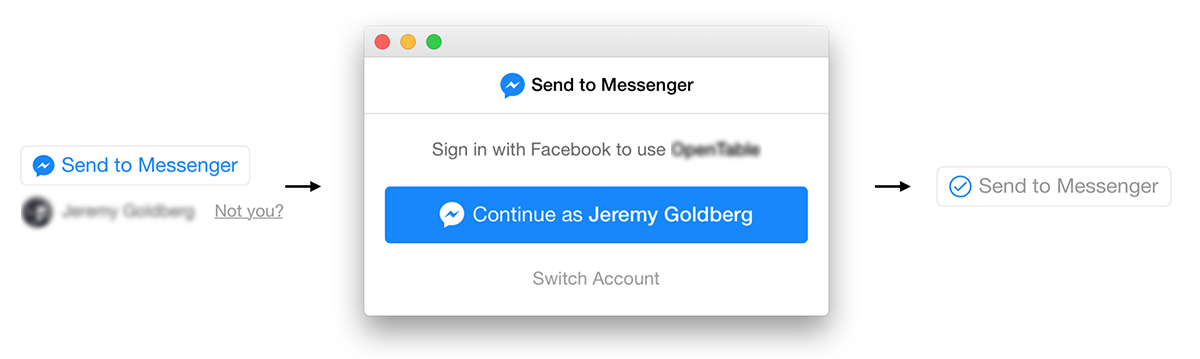
This plugin will add a button to your website that will allow visitors to opt-in to receive messages from you on Messenger. This button is called “send to Messenger.” This comes in handy when offering follow-up at a later time, such as confirmations and changes to the information that was previously provided. This plugin is only compatible with websites that use HTTPS.

CODE GET, EDIT, AND DELETE CODE
This list presents all of the plugins that you have developed up to this point, and it allows you to retrieve the embed code for a specific plugin even if you have lost it, changed it, or removed it.
Simply select the “Create Plugin” option in order to produce a new plugin.
INSTALL A BUTTON IN THE SUCCESS MESSAGE AND INSTALL A BUTTON IN THE SUCCESS MESSAGE #
When you successfully opt in, this message will be displayed. If you so choose, you can incorporate a button within the success message, and you can also include a URL for further action. You also have the option of creating an error message to appear in the event that the checkbox is left unchecked.
OPTIN Confirmation Message Received in Inbox, Reference Given, and Label Assigned
Pick the format you want to use. When the system sends the welcome message to the visitor’s messenger inbox, this template will be utilised to format the message. Users of the plugin will be automatically categorised according to the conditions you provide in the system. Keeping track of the plugin requires using the reference.
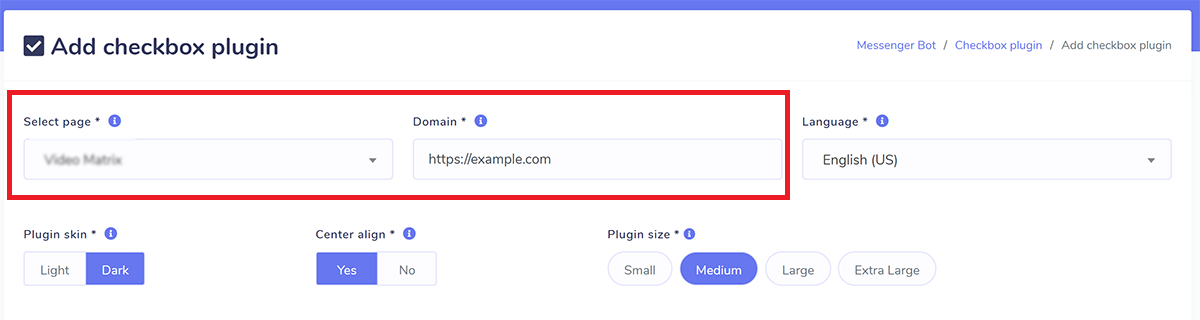
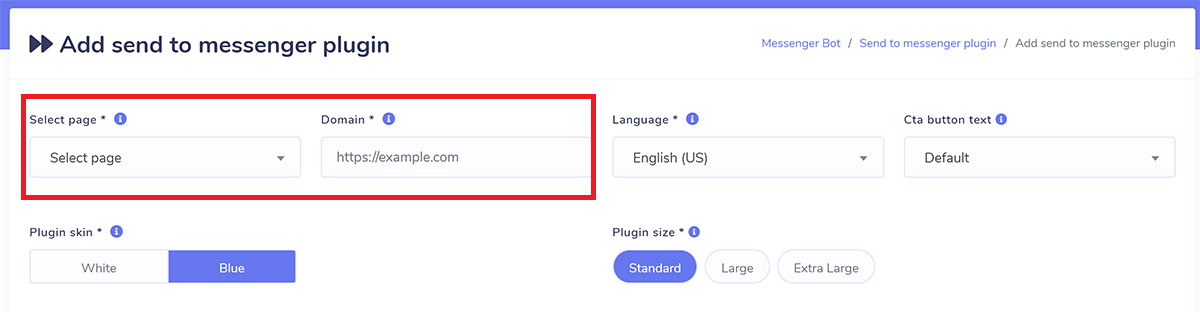
SELECT PAGE, PUT DOMAIN & CHOOSE APPEARENCE
A QR code and a link to M.me
Users can be sent to a specific person, page, or bot in Messenger by using the m.me service, which is run by Facebook and shortens URLs. You can put them to use on your website, in your email newsletters, and in a variety of other places. You are able to link individuals directly to your Messenger bot by using the m.me link that is associated with your bot. If the link is clicked, a discussion will instantly open up either on messenger.com or in the Messenger app for mobile devices. In addition to that, a QR code image of your m.me link will be provided to you from the list that is below.
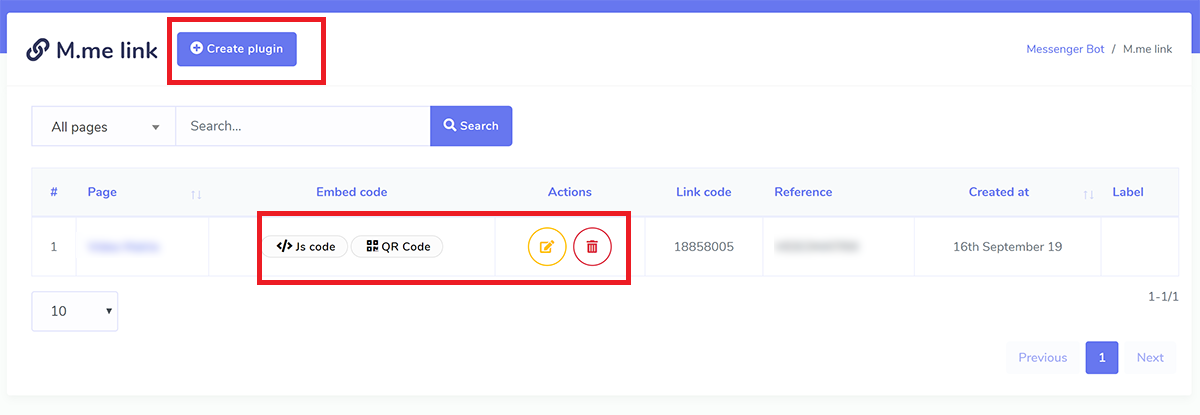
CODE GET, QR DOWNLOAD, EDIT & DELETE
This list presents all of the plugins that you have developed up to this point, and it allows you to retrieve the embed code for a specific plugin even if you have lost it, modified it, or removed it.
Simply by clicking the QR Code icon that is situated in each row, you will be able to generate a QR code for your m.me link. Simply select the “Create Plugin” option in order to produce a new plugin.
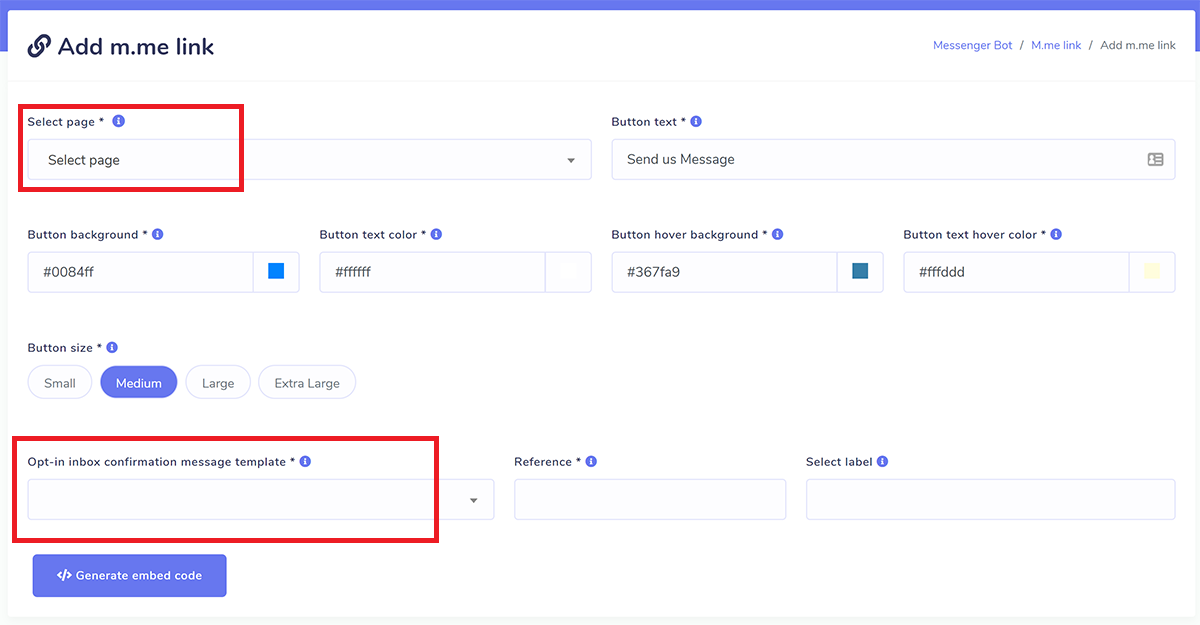
CREATE A NEW PLUGIN
This template will be utilised whenever the system communicates with the visitor’s messenger inbox to provide the welcome message.
The system will automatically assign users of that plugin to the labels that have been chosen. Keeping track of the plugin requires using the reference.
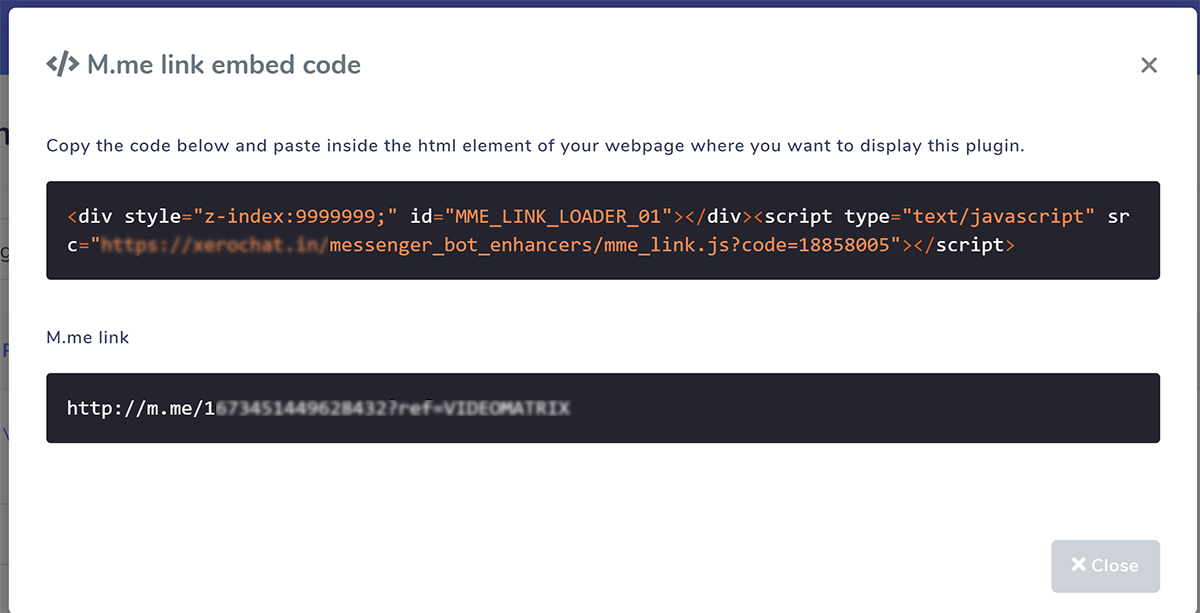
Make a copy of the code that is displayed, and then paste it into your website.
You may either use the m.me link directly wherever you like, or you can place this code inside the html block on your website where you want to show this plugin button.

Customer chat plugin
Users can be sent to a specific person, page, or bot in Messenger by using the m.me service, which is run by Facebook and shortens URLs. You can put them to use on your website, in your email newsletters, and in a variety of other places. You are able to link individuals directly to your Messenger bot by using the m.me link that is associated with your bot. If the link is clicked, a discussion will instantly open up either on messenger.com or in the Messenger app for mobile devices. In addition to that, a QR code image of your m.me link will be provided to you from the list that is below.
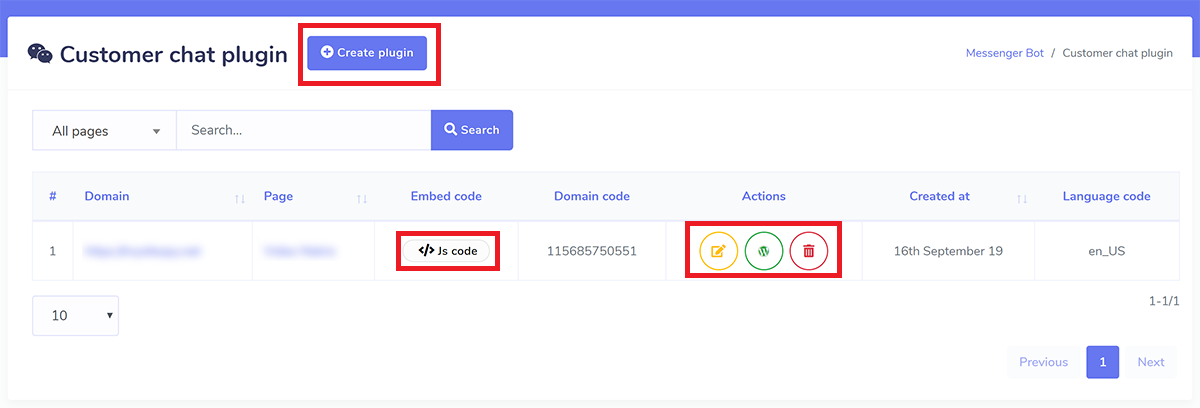
GET CODE, EDIT CODE, AND DELETE CODE
This list presents all of the plugins that you have developed up to this point, and it allows you to retrieve the embed code for a specific plugin even if you have lost it, modified it, or removed it. Simply select the “Create Plugin” option in order to produce a new plugin. Instead of embedding the code by hand, you can also download the wordpress version of this plugin by clicking on the WordPress icon. After downloading it, you can install it on your wp site in the same way as any other WordPress plugin.
CREATE A NEW PLUGIN
This template will be used whenever the system communicates with the visitor’s messenger inbox to provide the welcome message. The system will automatically assign users of that plugin to the labels that have been chosen. Keeping track of the plugin requires using the reference.
2. SUBSCRIBER BROADCASTING
Promotional Message Available 24 Hours
Chatbot pages inside SocialNowa have the ability to deliver promotional messages to subscribers. Subscribers are individuals who have communicated with the page within the previous twenty-four hours. When an individual reacts to a company using one of the acceptable activities indicated in the messenger conversation entry points, the 24-hour time limit begins a new countdown from the beginning. Because the algorithm that calculates eligible subscribers in our system has been built with a 23-hour time frame in order to reduce risk, the number of targeted subscribers may be lower than the actual count of subscribers.
Message that is not promotional in nature (outside of the 24-hour window)
If you use one of the tags that are provided below, you can send a message that is not promotional to all of your subscribers whenever you choose. Be careful when using broadcasting in conjunction with message tagging. The message must not include any form of advertisement or promotional content, and it must make use of an acceptable tag that is suitable for the purpose of sending messages to the targeted individuals. If you use message tags on your page without a good cause, Facebook has the option to disable the messaging feature for your page.
If you click to Messenger Broadcast > Subscriber Broadcast, you will be able to view all of the broadcasting campaigns that you have already created.
The current status of the campaign is detailed under the status column. There are a total of four possible statuses, and they are as follows: pending, processing, on hold, and done. Pending means that the task has not yet been begun, the processing indicates that it is now being worked on, on-hold indicates that it has been paused, either by you or the system, and ultimately completed shows that the task has been finished.
When you click on the briefcase symbol, additional actions will become available. Some of these actions are edit, delete, report, pause, resume, and force-reprocessing. Because this is a cron-based system, the pausing of the campaign will become effective at the beginning of the next cron cycle.
Since the campaign is still in the processing stage, no changes or deletions can be made.
When you force reprocessing, it indicates that you are going to start the campaign processing over again from where it left off. You should only do so if you believe that the campaign has been dormant for an extended period of time and hasn’t communicated anything for an extended period of time. It’s possible that this was caused by a timeout on the server, the server becoming down while the previous attempt was being made, or some other server issue. Therefore, only click the OK button if you believe the message has not been sent.
NEW CAMPAIGN
Simply select the “Create campaign” option from the drop-down menu to start a fresh campaign. Select both the page and the type of broadcast you want. You are well aware that choosing a tag is necessary for broadcasts that are not promotions.
You have the ability to target the audience for the campaign based on label, gender, time zone, and location. Please be aware that you won’t be able to see the label targeting until after you’ve selected the page. Label targeting can be used in both directions, including as well as excluding. You can see the campaign summary on the right side of the page. In it, a number of the audiences that are going to be targeted by this campaign are mentioned.
Now comes the part where you design the actual content of the message. You have the ability to deliver structured material such as text, photos, audio, video, and files as well as rapid replies, text with buttons, generic templates, carousels, and media templates such as bot settings. You may also view a brief preview of how it appears on the right side of the screen.
REPORT
The report on your campaign will look like this when it is finished. The report details the progress of each send as well as any mistakes that may have occurred. If there are 30 errors in a campaign, the campaign will be placed in an on-hold position automatically. This is done to keep you safe. You have the option to force the processing if you believe that you are safe to send.
3. SEQUENCE MESSAGING
A marketing strategy known as sequence messaging is one that “drips” or sends out over the course of time a pre-written collection of messages to messenger bot subscribers. Messenger bot subscribers can get both promotional and non-promotional messages with a tag message sequence if this feature is enabled and used. It does this by utilising the BOT API to send the messages. The subscribers will be automatically assigned to your sequence campaign depending on the entry point (engagement plugins) or post-back click that they used in order to join your list. Nevertheless, you also have the option of directly assigning it or changing the campaign.
Make a New Attempt at the Sequencing
You will see a new block titled “sequence message settings” if you navigate to Messenger Bot > Bot Settings. This will display all of the sequences that are currently set for use on that page. To add a new sequence, click the Add Sequence button. In addition, a suitcase symbol will be displayed next to each sequence setting on the list. Clicking on this icon will provide expanded action buttons for things like editing, deleting, and seeing reports.
Sequence TYPE
There are a total of six different sequences to choose from. There needs to be a type sequence that is the default for each page, no limit to the number of sequences of different types that can be created.
DEFAULT SEQUENCE
In the event that another more advanced sequence cannot be located, any new subscriber will be placed in this sequence. The creation of a default type sequence is mandatory, and you are only allowed to make one instance of this type.
CUSTOM SEQUENCE
It is very helpful to assign a sequence manually to a subscriber from Subscriber Manager > Bot Subscribers > Action or specify a sequence while creating a postback from Messenger Bot > Postback manager. You have the ability to create multiple unique sequences, and it is also very useful to create multiple sequences.
RE-TARGETING OF MESSAGE SUBSCRIBER ENGAGEMENT (SEQENCE BASED ON ENTRY POINT)
The remaining types indicate different kinds of message engagement technologies. Take for example the case where we are employing a checkbox type. When you click it, a list of your checkbox plugins will appear, and you can choose from among them. If a person visits to your site and checks in using that checkbox plugin, then that visitor will automatically be added to this series campaign. After successfully responding to the message that was sent in response to the checkbox OPT-IN, the sequence message campaign will then be assigned to the checkbox plugin. The checkbox type is used for all of the other types as well, thus they are all identical.
SEQUENCE TIME
Under the “24-hour promotional” sequence, you have the ability to transmit any type of promotional content. It is acceptable for pages to deliver promotional messages to subscribers who have communicated with the page within the last twenty-four hours.
When an individual reacts to a company using one of the acceptable activities indicated in the messenger conversation entry points, the 24-hour time limit begins a new countdown from the beginning. Because of the implementation of the eligible subscriber calculation algorithm in our system, which uses a 23-hour time frame to reduce risk, the number of targeted subscribers may be lower than the actual count of subscribers.
Make careful use of the daily non-promotional sequence in conjunction with the message tag. The message must not include any form of advertisement or promotional content, and it must make use of the proper tag that is relevant for the purpose of delivering communications to the individuals in question. If you use the message tag on your page without a valid reason, it is possible that the messaging option on Facebook will be disabled for your page.
You are allowed to send a maximum of 30 messages in this sequence, with the days 1 through 30 serving as the range. You have the ability to choose the exact time of day that the message will be sent out for daily non-promotional campaigns. Messages will begin to be processed by the system at the beginning of the day’s first hour, and processing will continue until the end of the day’s final hour. The least amount of time that must pass between each step is one hour. If the list of people who have subscribed to this campaign is quite vast, you should choose a longer time period in order to ensure that all of the messages are sent correctly.
REPORT
The following is an example of what the report of hourly and daily sequential messages will look like respectively. It will display the report for each hour or day of each send, as well as the status of the send and the delivery, along with any error messages that may have occurred.
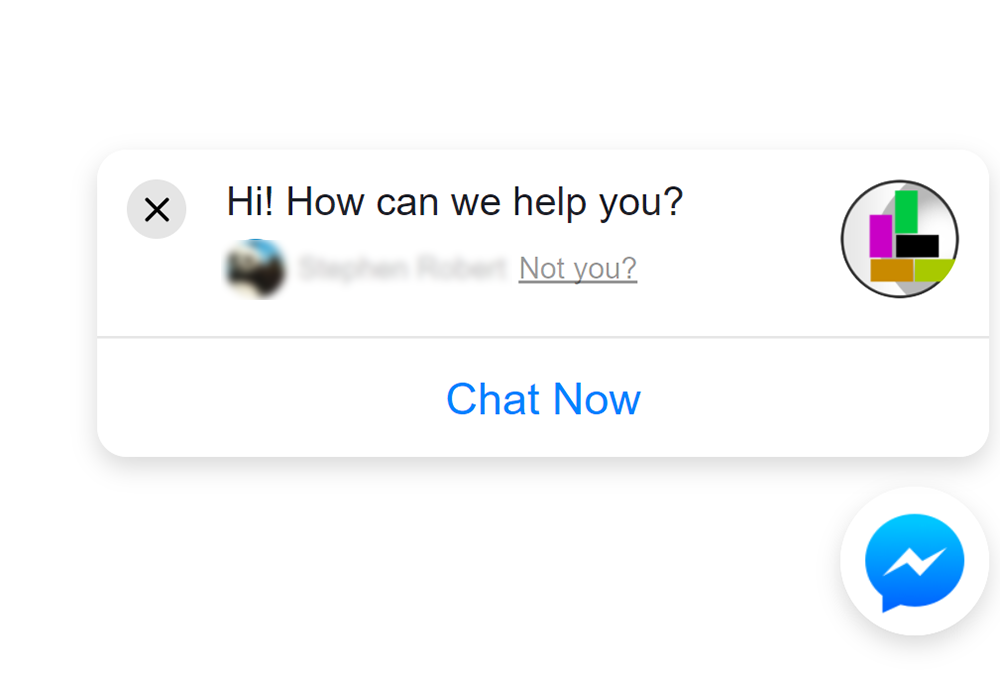
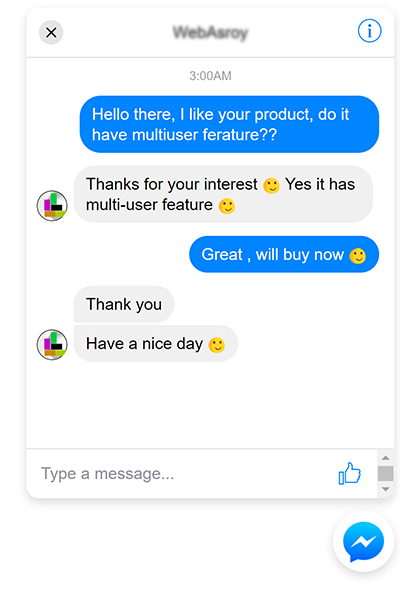
HOW IT WILL LOOK LIKE ON YOUR SITE