- Introduction
- How to set the User Input Flow and Custom Fields:
- Create a Custom Field | SocialNowa Chatbot User Input Flow and Custom Fields
- Instructions for completing the form | The SocialNowa Chatbot User Input Flow and Custom Fields
- How to fill out the form | SocialNowa Chatbot User Input Flow and Custom Fields
- How to complete the form as follows:
Introduction #
The best marketing software in the world, SocialNowa Chatbot, has just recently added a fantastic new feature that is being referred to as “User Input Flow & Custom Fields.” This feature will operate with the messenger bot that comes with the SocialNowa Chatbot.
Together, the feature and the messenger bot that comes with SocialNowa Chatbot have the ability to gather a variety of various forms of information, and then immediately use this information to communicate effectively with people; it can communicate as well as a human being.
Instead of taking the user to a web-view and directing them to fill out a field, it collects information within the very messenger while it is speaking with the users. This compares with web-view, which takes the user to a web-view. In addition, the feature gathers information without informing users to click on “Quick reply” buttons for their phone number, email address, or birth date. This information can be used to contact or identify the user. As a result, individuals do not feel restricted in providing their information. Well, in addition to the users’ phone numbers and email addresses, as well as their birth dates, it is able to gather any kind of information that is formatted as text, numbers, or datetime. Additionally, it is able to gather links, files, pictures, and videos.
To put it another way, the User Input Flow and Custom Fields features of the SocialNowa Chatbot are capable of collecting data of any kind. In addition, the information will be stored in SocialNowa’s Messenger Subscriber, a feature that was designed specifically for the purpose of storing data obtained from Facebook Messenger. In addition, it immediately adds the customers’ email addresses and phone numbers to the Messenger sequence campaign that is being run by SocialNowa Chatbot.
How to set the User Input Flow and Custom Fields: #
First, you have to make a campaign on the interface of User Input Flow and Custom Field. Then you have to make bot reply settings, selecting the User Input Flow as Reply type and selecting the campaign you have created on the interface of the feature. Then the feature will be able to collect different kinds of information from the users.
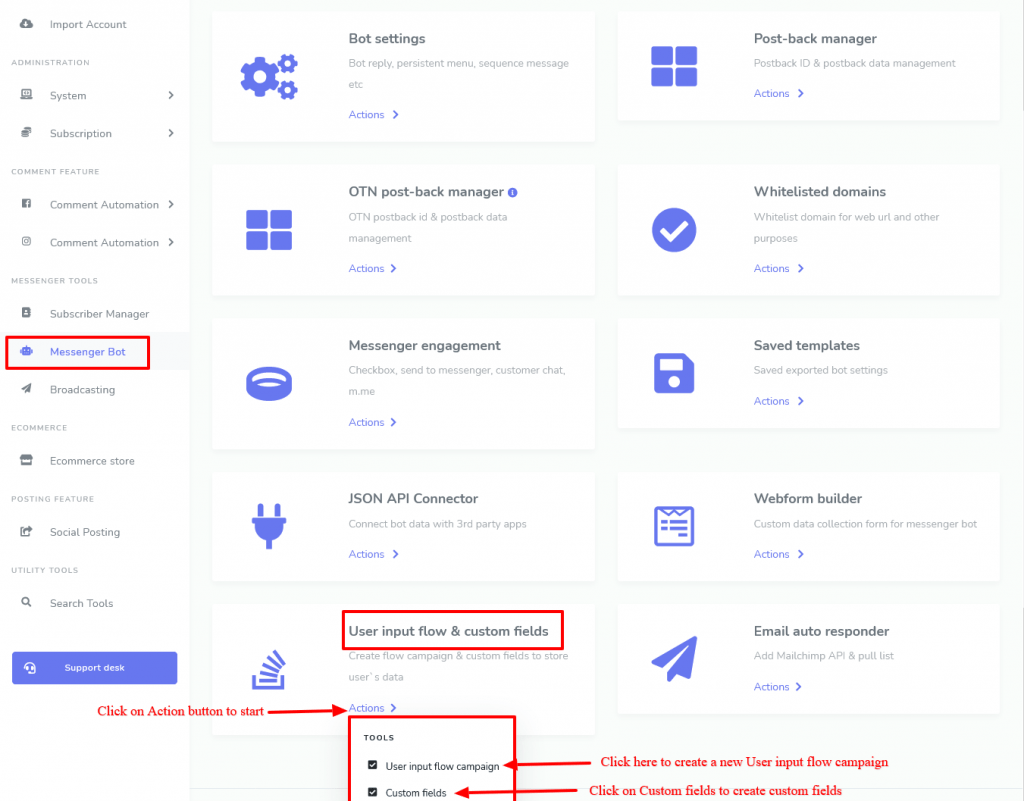
To make a campaign for User Input Flow and Custom Fields, go to Messenger Bot> User Input Flow and Custom field> Action Button.
When you click on the Action button, under the action button, you will see two sub-menus–Create User Input Flow Campaign and Create Custom Field.
Create a Custom Field | SocialNowa Chatbot User Input Flow and Custom Fields #
It is necessary to generate custom fields whenever you require a field that is not one of the pre-defined options provided by the system. Now that we have everything out of the way, let’s look at how to make a custom field.
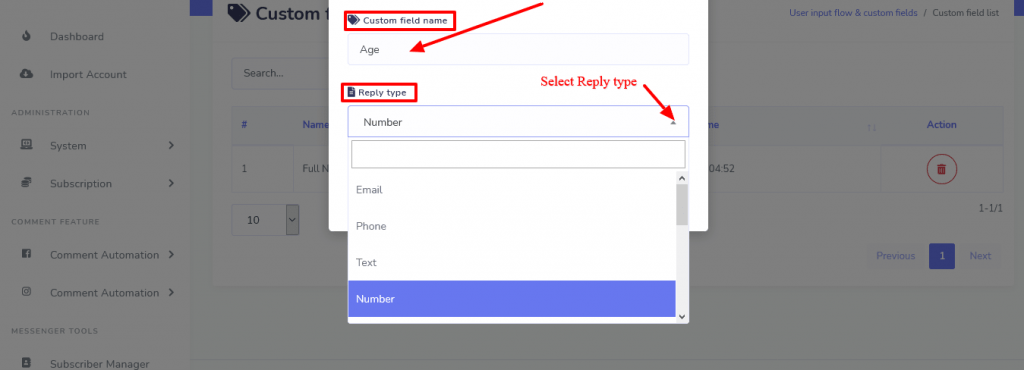
To start, select Action > Custom Field > from the menu. Select the “New Custom Field” option, then proceed to fill out the related form before selecting the “Save” button.
When you click on the button labelled “New Custom Field,” a form will be presented to you. In addition, you will need to fill out the form, provide a name to the custom field, and choose a response type from the drop-down menu. Select “Save” from the drop-down menu.
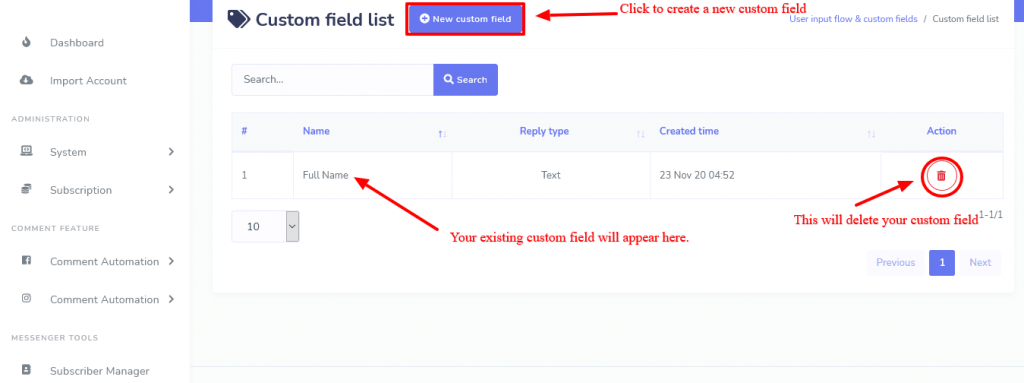
Immediately, the custom fields that you entered will show on the page beside a button that allows you to delete them. You are free to add as many individualised fields as you like. Simply pressing the “Delete” button will allow you to get rid of any current custom fields you have created.
Immediately after clicking on the button labelled “New Flow,” a form will appear, which needs to be filled up by the user.
Instructions for completing the form | The SocialNowa Chatbot User Input Flow and Custom Fields #
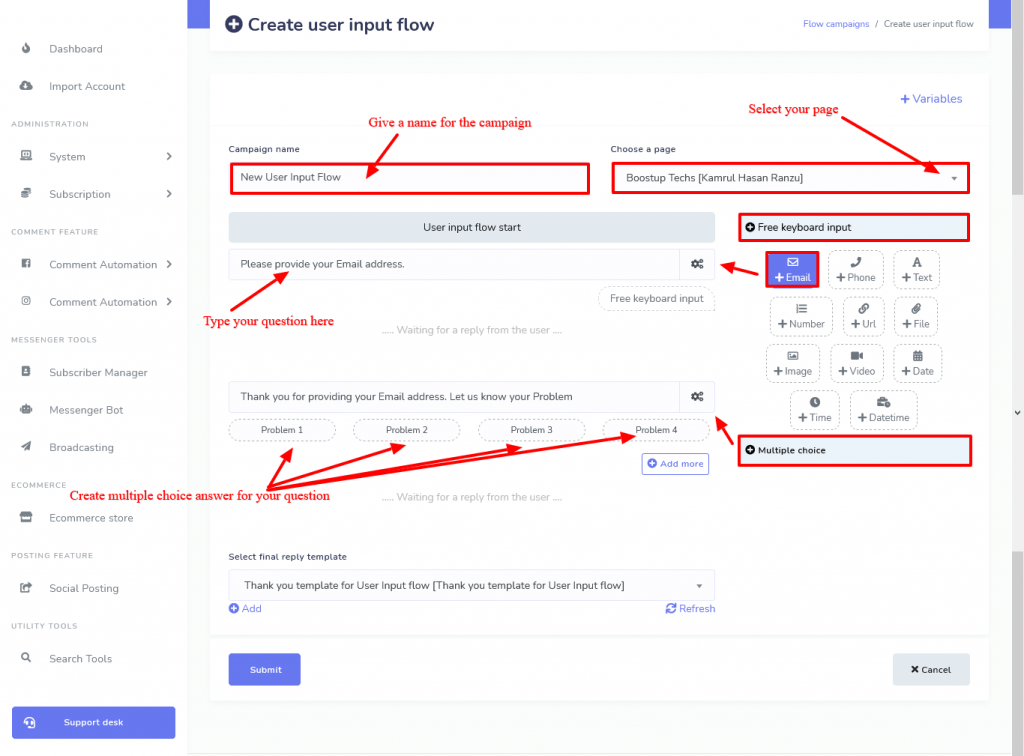
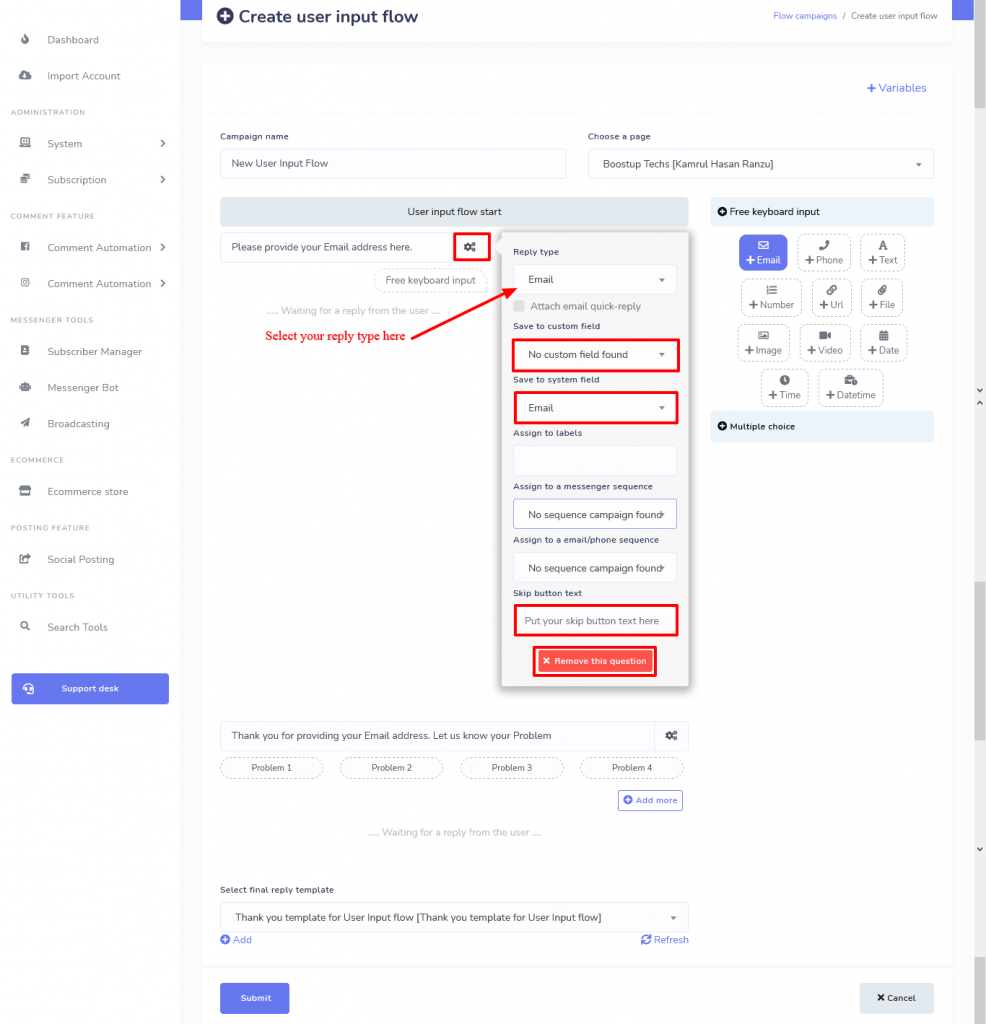
In the first step, you will need to give your campaign a name in the box designated for the campaign name and then select your Facebook profile. You will find two different kinds of question builders over on the right-hand side of this page. These are Free Keyboard Input and Multiple Choice. Choose the Multiple Choice option if you want your questions to have multiple answers for respondents to pick from. However, if you wish to inquire about something more general, choose the Free Keyboard input option and select and format the appropriate question from the table.

All right, how about we start a campaign?
To begin, select a format for the free keyboard choice from the table of available options. Instantly, a box with a settings button will show up on the right side of the screen.
In regard to the question that contains multiple choice possibilities, you should click on those options. Additionally, in addition to a question box, you will be presented with four options from which to select the answers that you would want to provide for the questions.
Simply selecting the “Add more” button will bring up other options for you to select from. Now enter your question, and when prompted for multiple-choice answers, insert your selections before clicking the settings button. As soon as you click the settings button, a drop-down form will become visible on the screen. At this point, you need to fill out the form.
How to fill out the form | SocialNowa Chatbot User Input Flow and Custom Fields #
You are able to establish a campaign for User Input Flow with the custom field that you have generated once you have finished creating your custom field.
Messenger Bot > User Input Flow and Custom Fields > Action > User Input Flow Campaign > is where you should navigate to in order to build a campaign. After clicking on the New Flow button, you will be taken to a form that needs to be filled out.
Instructions for completing the drop-down menu
You will be able to see the format that you picked from the table under the free keyboard options displayed in the field labelled “Reply type.” Naturally, you have the ability to change the format by applying a drop-down list.
Now it is time to decide where you want the information to be saved; you can choose to save it in the system field or in the custom field. and free to make use of either or both of them. You are able to affix a label with the information. In this scenario, the first thing that has to be done is to establish a label for the Facebook page that you have picked here using the messenger subscriber’s label/tags option.
In the box labelled “Assign to messenger sequence,” choose a messenger sequence to assign the message to; if you prefer, you can leave it blank. You need to add the messenger sequence from within the settings for the sequence messenger. You may find out how to add the messenger sequence by reading the blog.
The next step is to choose an email or phone sequence to assign in the box labelled “Assign to email/phone sequence.” Additionally, it is not required, so if you like, you can leave it blank. Please read the blog post in its entirety in order to learn how to add the email/phone sequence.
Simply enter some text into the box designated for the skip button to enable the skip button that will appear under the question. Users have the option of skipping the question by clicking the “skip” button located below it.
If you want to get rid of the question, there is an option labelled “Remove this Question” at the very bottom of the drop-down menu. Click on that link.
When you have finished adding a question and customising the settings for the question, you will see a box labelled “Select Final Reply Template.” Within this box, you will need to choose a template for the final reply. In this situation, you will need to create the response template on your own. You can construct the template by going to the bottom of the box and clicking on the ‘Add’ button. Simply click on the box if you already have a reply template made, and a drop-down menu containing all of your previously saved reply templates will display. When your customers have done responding to all of the questions in the survey, this reply template will send a concluding message to the customers.
To complete the process of designing the campaign for the user input flow, please now click the submit button. The campaign will show on the page in an instant after you click the button.
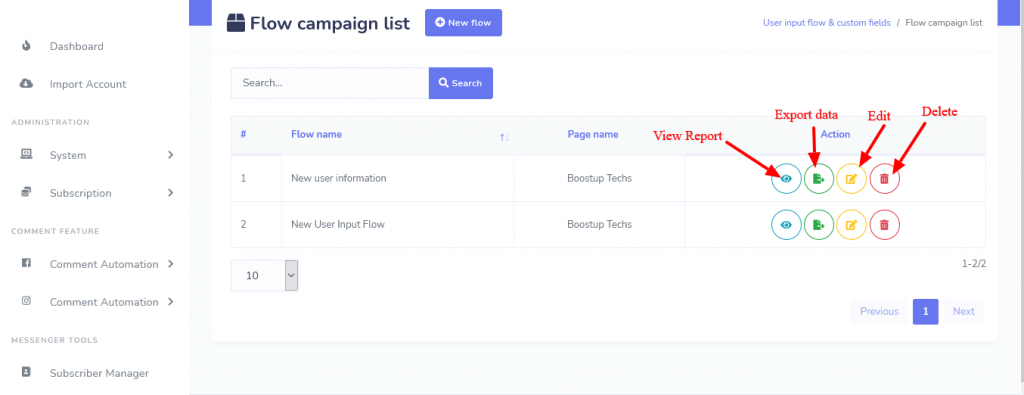
Anyway, you can add as many campaigns as you like. In addition, each of the campaigns will be shown in a list format on the page.
You have the ability to view and update reports, as well as remove and export data for any User Input Flow Campaign.
Building a Connection Between the User Input Flow and the Messenger Bot:
You must now build a connection between the campaign and the messenger bot in order to collect data from users.
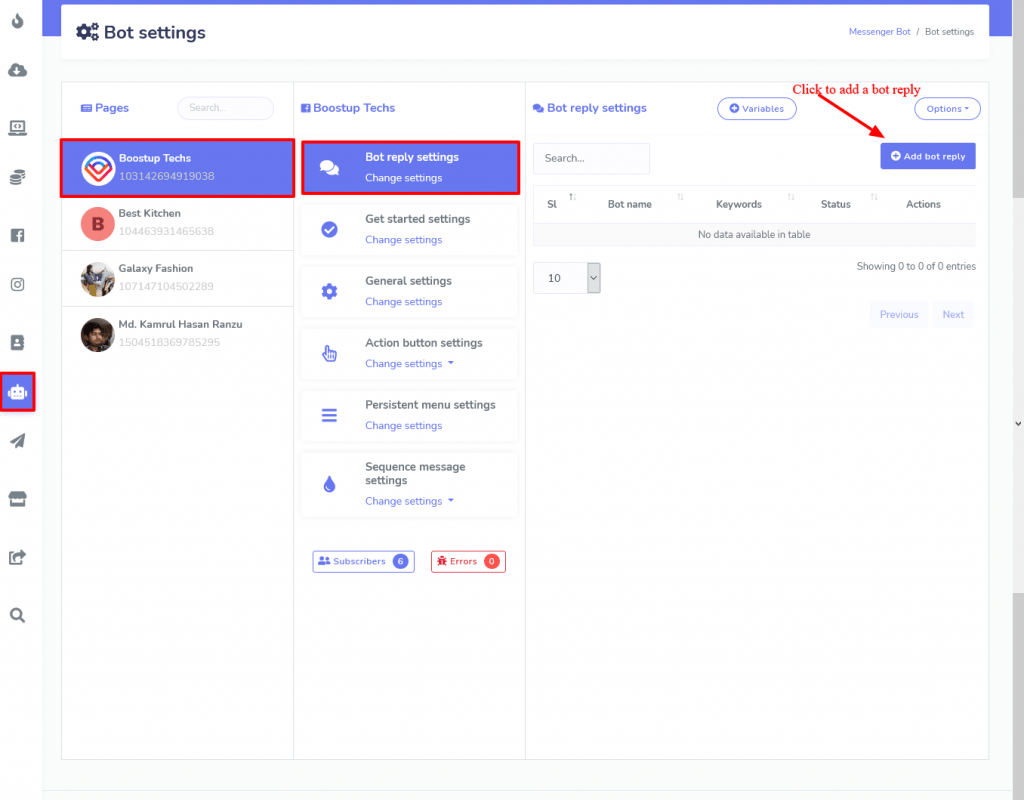
To link the campaign with the messenger bot, select Messenger Bot > Bot Settings > Action > Bot Reply Settings > Add Bot Reply from the menu at the top of the screen.
Now, click on the Add Bot Reply button, and you will see a form appear very immediately. The next step is for you to fill out the form.
How to complete the form as follows: #
In the space designated for the Bot name, type a name for the bot. After that, in the “Keyword” box, jot down some keywords, separating them with commas. After that, choose a type of reply to enter in the box labelled pick reply type. When you click on the box that says “choose reply type,” a selection of possible reply kinds will appear in a drop-down menu. Choose User input flow from the available options in the drop-down menu. You can also set a time delay in reply in seconds by using the radio button, and typing can be displayed on the screen if you choose to activate that option.
In the space designated for the Bot name, type a name for the bot. After that, in the “Keyword” box, write down some keywords, separating them with commas. After that, choose a type of reply to enter in the box labelled pick reply type. When you click on the box that says “choose reply type,” a selection of possible reply kinds will appear in a drop-down menu. Choose User input flow from the available options in the drop-down menu.
Now, click on the Select a Flow Campaign button, and a drop-down list containing all of the campaigns that you have already built will display. After that, choose a campaign, and then click the button that says “Submit.”
The next step is to click the “submit” button.
The campaign will begin as soon as one of your users sends a message through your messenger that contains any keyword that you have specified in advance.
You also have the option to include the User Input Flow campaign when using the Get Started template for the Messenger Bot.
When you click on Action Button Settings inside the Bot Reply settings page, a popup menu will become
available to you. Choose the “get started” template from the list that appears when you open the menu. The get started template will show in the right-hand panel of the website as soon as you click on it. You must now fill in the blanks on the template.
After selecting the “Select Reply Type” button, an instant menu will appear for you to choose from. Pick the User Input Flow option.” Now, click on the Select a Flow Campaign button, and a drop-down list containing all of the campaigns that you have already built will display. After that, choose a campaign, and then click the button that says “Submit.”

The user input flow campaign will be started the moment a user clicks on the “Get Started” button located on the messenger section of your webpage.
We appreciate you taking the time to read through the guidelines on how to set up a campaign for the User Input Flow and connect the campaign with the Messenger Bot.