It is quite usual for subscribers to be gained through the use of an opt-in form located on an external website. However, the part of this function of SocialNowa that is the most intriguing is that, in addition to collecting subscribers through an opt-in form, it also allows the freedom to create an opt-in form by dragging and dropping the fields in the exact sequence.
The form will generate an embedded URL that you can use on your own website or any website from which you wish to gather email or phone subscribers into your SocialNowa Chatbot application. You may use this URL either on your own website or on any website.
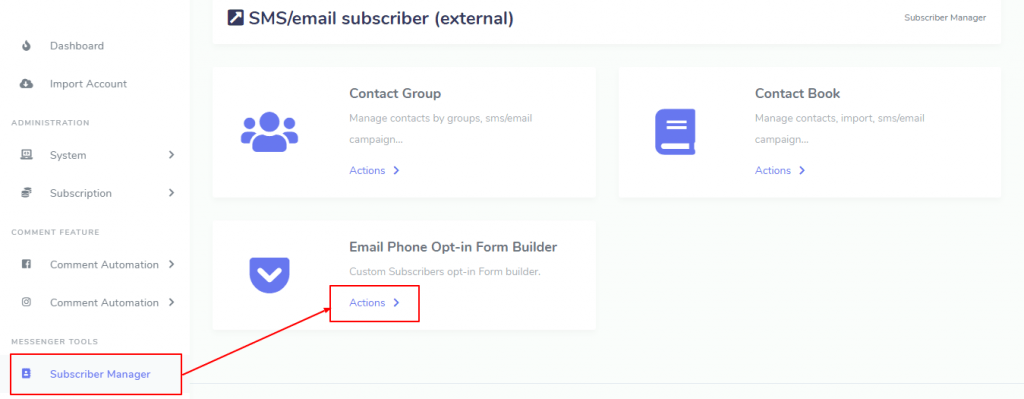
Control the Opt-in Form #
In order to put an opt-in form to use, you will first need to develop the form itself. Therefore, created as a means to Subscriber Manager->Email/Phone Opt-in Form area in order to get access to the opt-in form part.
Create an opt-in form. #
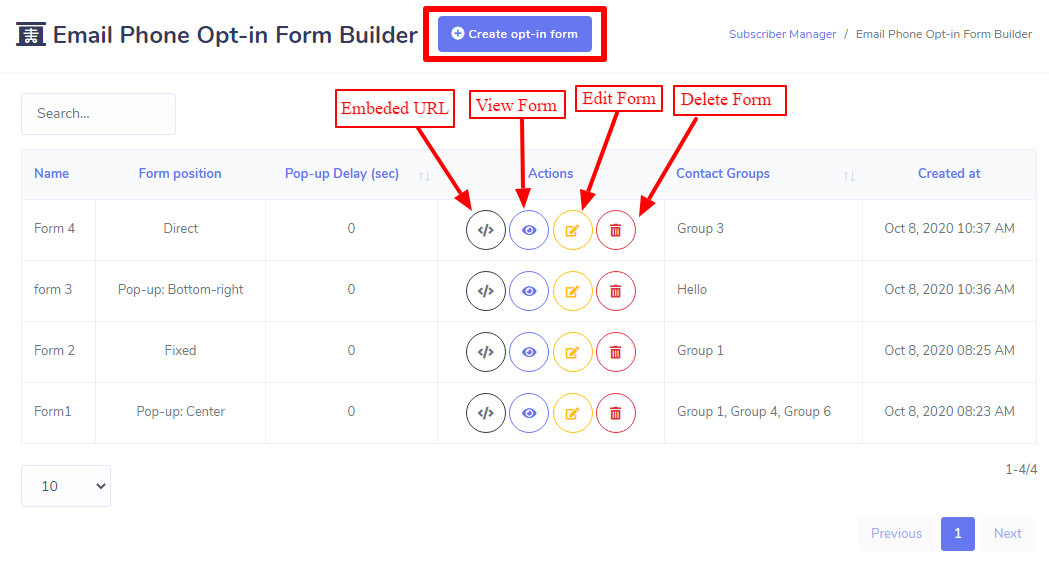
You will be able to design, examine, and change the form within the email or phone opt-in area, and you will also have the option to delete the form in the most straightforward manner possible from the actions portion of the Form Lists table. When you click the button labelled “Create Opt-in Form,” a new window will open displaying a form that allows you to construct the opt-in form using a drag-and-drop interface.
You will be asked to provide certain information using the form builder choices that are provided in the form. The following is a condensed explanation of each field that can be found on the form.
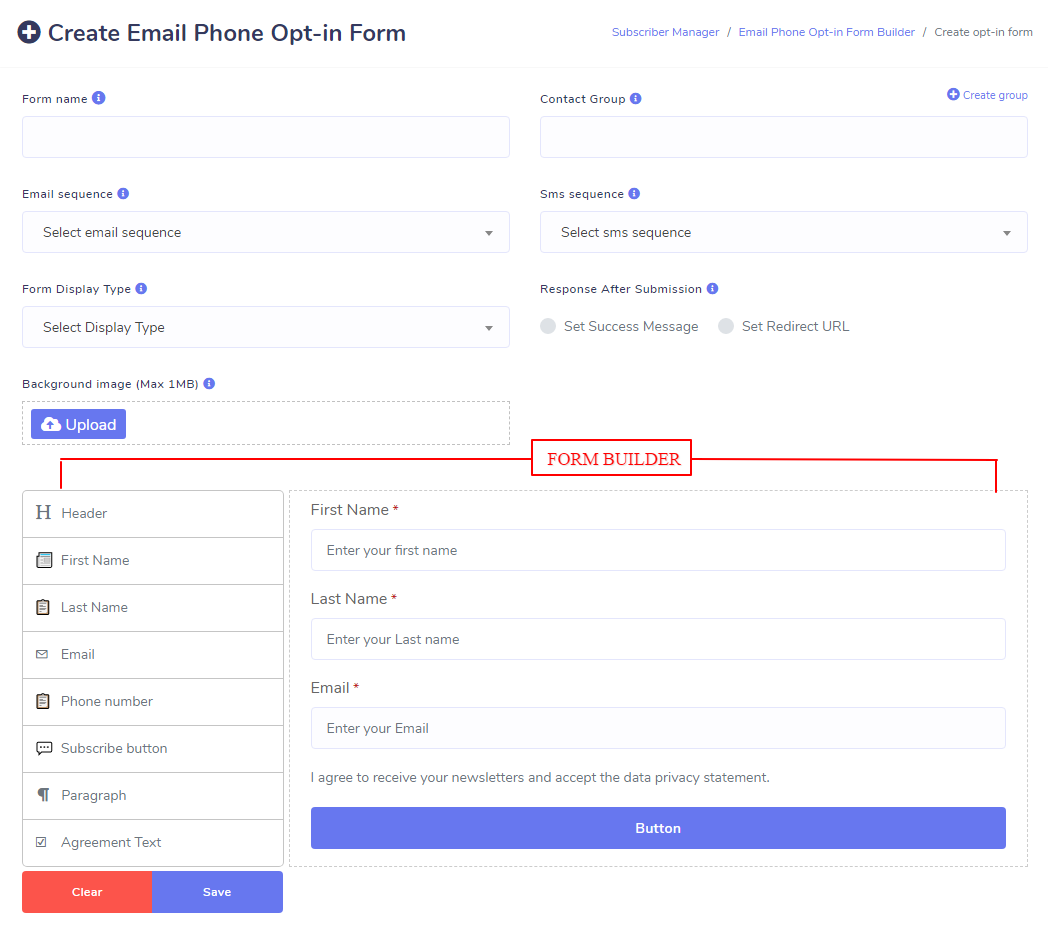
Name of the Form:
This is the name of the form that will be shown nowhere else but in the application’s form table.
To Whom It May Contact:
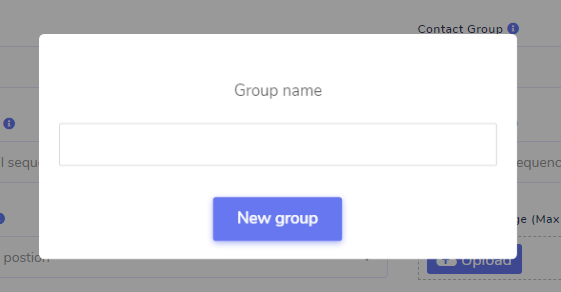
This field will display contact groups that have been created in the Subscriber Manager > Contact Groups section, and those contact groups can be selected here. Because new subscribers who sign up using the opt-in form will be added to external subscriber lists, this section must be filled out before the form can be submitted. Therefore, whenever a new subscriber is gained through the use of the opt-in form, that subscriber will be added to the contact groups that were selected prior to the development of the form. You can select several groupings. Additionally, subscribers will be added to many groups at once.
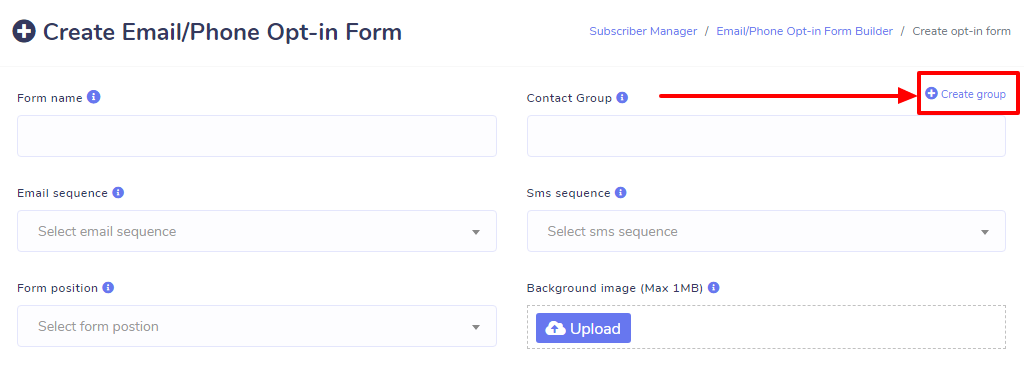
Anyway, if you want to create a group, you can do so from this field as well by selecting the Create Group button that is located on the right side of the field.
Performances of a Formal Nature:
This particular field must be filled out. In addition to being able to construct a form, you will also have the capability of deciding where on the page your form will be shown when it has been saved. In any case, there are four different types of positions, and they are as follows:
When you choose Pop-up as the type of display to use, a new field labelled Pop-up position will become available. There will be two pop-up options available; choose either the bottom-right or the center one.
There will be two positions available, and their respective descriptions are as follows:
Bottom-right: If you select the Bottom-right location, your embedded form will appear in the bottom-right corner of the website on which you have placed it, irrespective of which position you select.
If you use the Center Position option, your embedded form will appear in the exact middle of the page on which you have it embedded if you use that option.
If you choose the option labelled “fixed position,” your embedded form will appear on the website in the location that you specify whenever the “fixed position” option is selected.
This is in no way a description of the work.
It is different from the three positions discussed above. If you choose this option, you will be given a URL in the next section. You or your user can gain instant access to the form that has been created by using this URL. Once you have copied the URL and pasted it into your browser, you will be able to see the form that you have made.
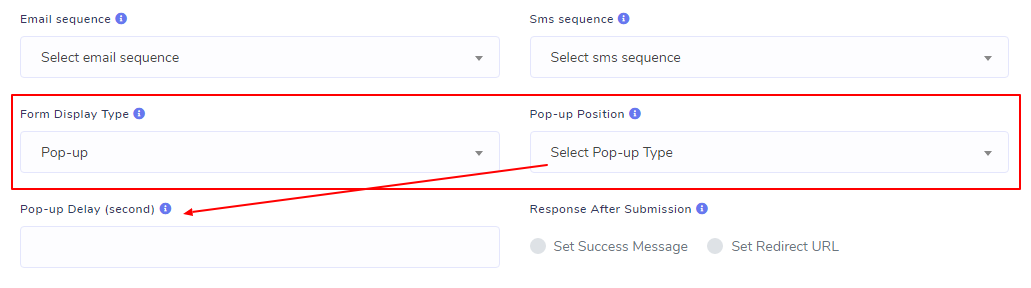
Pop-up delay:
The term “pop-up delay” refers to the amount of time that must pass before your form can be seen and processed as a second. If you put a one in the field, for instance, the form will become visible after one second has passed. This field will not be displayed when you first go through the form’s steps. There is a mandatory pop-up delay for all Pop-up Positions (Bottom-right and Center).
Background Image: You do not have to fill out this form. If you choose to upload a picture, that image will be used to populate the form body’s background instead of the default white.
Response After Submission:
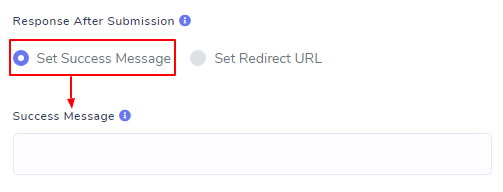
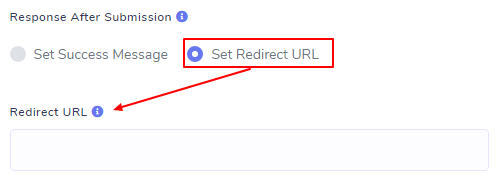
This particular field must be filled out. After the event, you will need to choose a response type and then fill out the form that relates to that response type in order to have a successful form submission. You have two alternatives to choose from, which are the successful message and the redirect URL.
Set Success Message: When you select the Set Success message option, a box will show up for you to enter the text of the success message. Therefore, this message will be displayed as a success whenever the form is successfully submitted by a user.
If you choose to set the redirect URL by selecting Set Redirect URL, then a field for the redirect URL will appear. Therefore, the system will automatically link the user to this URL in the event that the form is successfully submitted by anyone.
Form Builder #
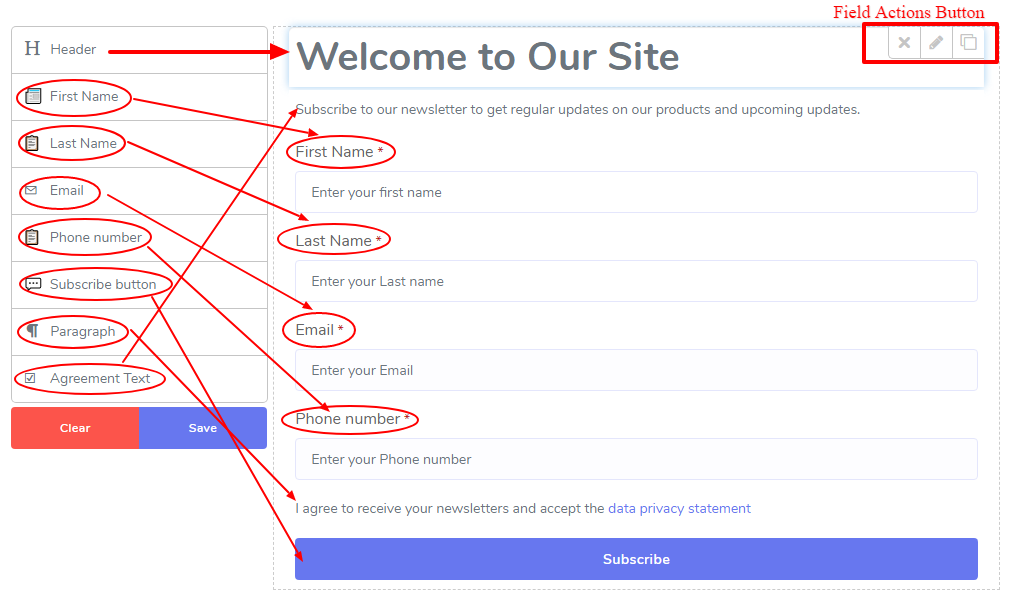
Create an opt-in form for your website using the elegant drag-and-drop builder for forms. The main body of the builder is divided into two sections: the first is a sidebar on the left that contains options that may be dragged and dropped, and the second is a field for selecting options on the right.
Options for Dragging and Dropping:
It is called the Email Phone Opt-in form builder for a reason: it provides numerous options for constructing a standard form for the collecting of email addresses or phone numbers from subscribers.
Header: Drag & Drop header option for Form Header. You have a variety of header types to select from.
To establish the brief information for the form, you can use drag and drop to move a paragraph into a text box.
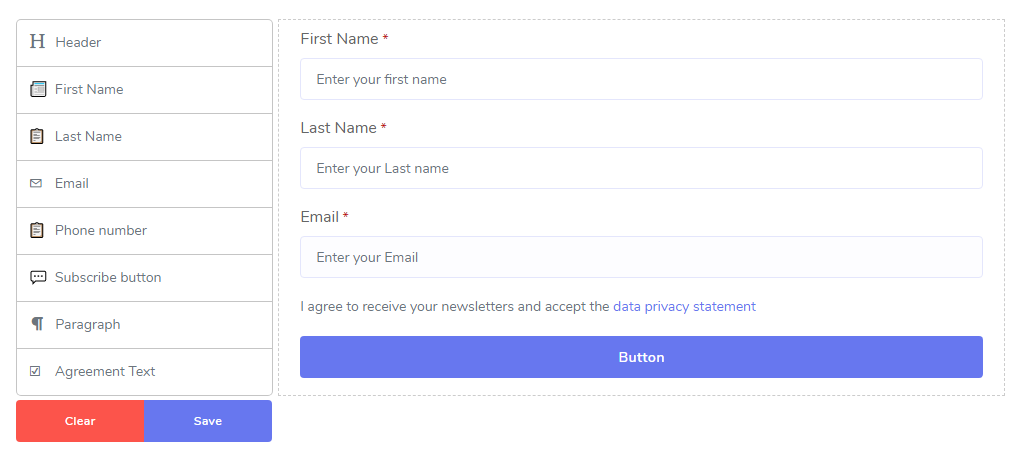
First Name: Using drag-and-drop operations on the First Name option, you can both set and retrieve the subscriber’s first name. By changing the field, you have the option of making it mandatory or not.
By changing the field, you have the option of making it mandatory or not.
Last Name: To get and set the subscriber’s last name, use the drag-and-drop feature on the last name option. By modifying the field, you have the option of making it mandatory or not.
Email: To get and set the subscriber’s email address, use the drag-and-drop feature of the email option. By changing the field, you have the option of making it mandatory or not.
By changing the field, you have the option of making it mandatory or not.
Phone Number: The ability to set and get the phone number of the subscriber is located under the “Drag and Drop Phone Number” heading. By modifying the field, you have the option of making it mandatory or not.
Simply repositioning this field will ensure that your subscribers have read and accepted your terms and conditions, as well as any additional agreements, before the form can be sent.
After all, the form need a submit button at this point, so simply drag and drop the Subscribe Button into the appropriate spot, then edit the button option to change the button’s name. You have a selection of options available to you for the buttons.
How to Use Embeded URL & Direct URL #
After creating a form, you can view the embedded URL by opening a modal that appears when you click on the link located in the Actions Column. Now all you need to do is highlight the embedded code, copy it, and then paste it into the section of your website where you want this form to appear.
If you copy the URL with the direct position, you will need to copy it and then paste it into your browser in order to access the form.
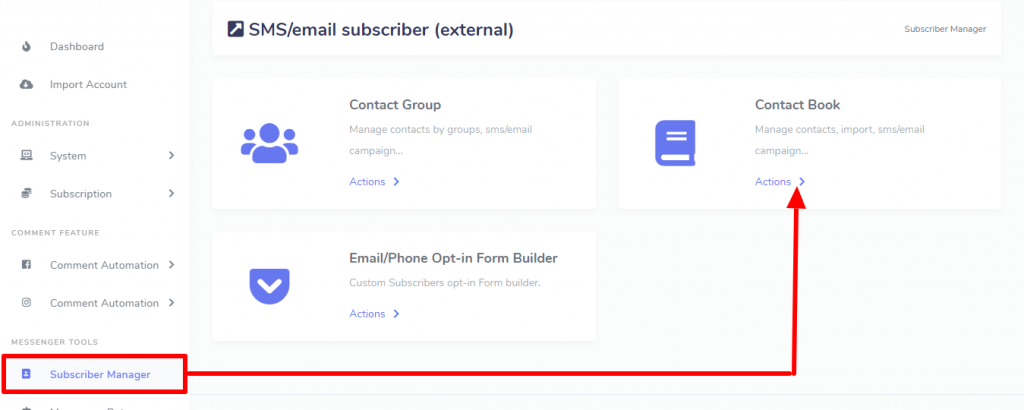
Subscribers Obtained Via Opt-in Form #
As they are subscribed to from a source external to the application, they will be saved there as external subcribers as they progress through the process. You can view the subscriber lists that were generated by your opt-in forms by going to Subscriber Manager > Contact Book Section.
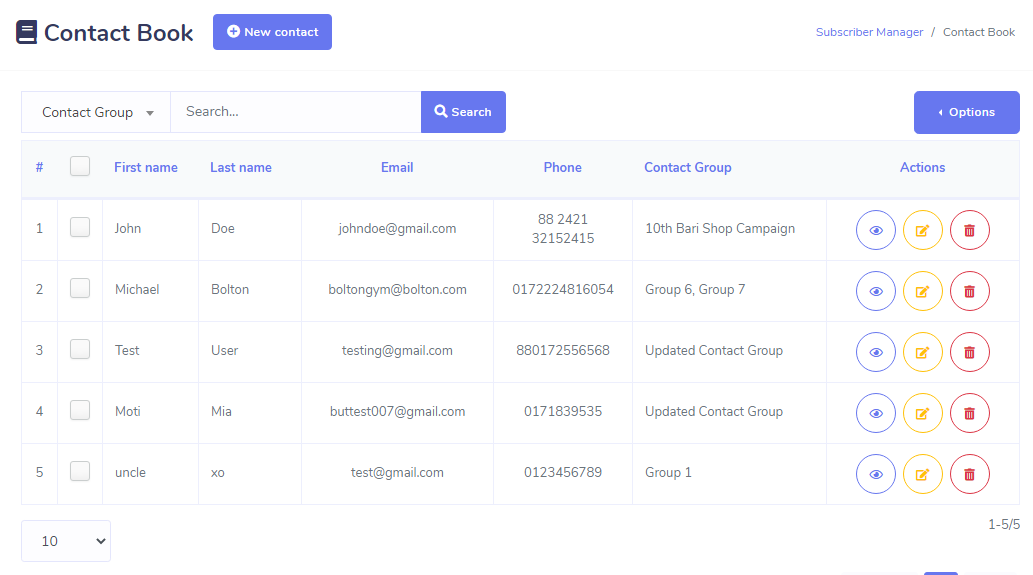
You are now able to send emails to these subscribers using their email addresses.